
Nissan Maxima Radio Removal ('95, '96, ...)
![]()
![]()
![]()
![]()
![]()
![]()
![]()
![]()
![]()
![]()
![]()
![]()
![]()
NOTE DISCLAIMER: I will not accept liability for anyone's repair attempts. This information is posted for informational purposes only. Don't try this without proper training. Any repair attempts are at your own risk. It may not be the same problem that mine had. Don't hold me financially liable to any damage or expenses you may incur. This may void any type of warranty on your radio.
![]()
![]()
Nissan Maxima '95-'96 - Radio Removal
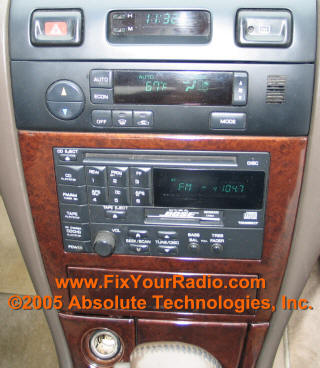
Figure 1 - Nissan Maxima 1995 -
1996
If you have a Nissan Maxima (approximate years 1995-1996) that looks like Figure 1, then you are likely to be suffering from one or more of a number of problems that haunt these radios....CD Err, blank display, erratic operations, shuts off or won't turn on at all, etc. If you have any of these problems, then you may want to look into the do-it-yourself repair instructions (the repair instructions should be as detailed and clear as the removal instructions below) Or, you may send your radio in for the repairs (typical cost of these repairs is $119.99 plus shipping...shipping is typically $24.99 for US Priority mail).
Here's how to get your radio out of the dash:
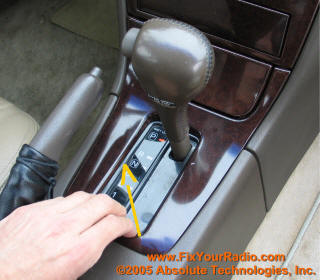
Figure 2 - Remove the Cover of Gear Shift
The Wood trim panel will pull away from the gear shifter. It may be useful to insert a screw driver (wrapped by a thin cloth to prevent scatches) between the wood panel trim and the black plastic of the shift indicator. You will want to pull (or pry) in the location where the fingers are in Figure 2 above. It takes patience but if can be worked loose.
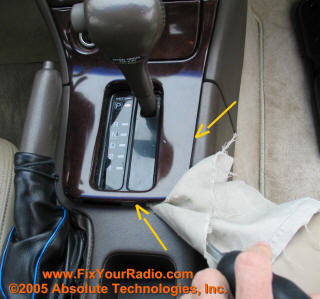
Figure 3 - Cloth Covered Screw Driver
Removing Cover of Gear Shift
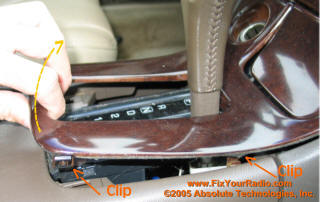
Figure 4 - Clips that Hold the Cover of
Gear Shift
Figure 4 shows the location of the clips that hold the wood panel in place. Figure 4 also shows how to pull up and the path to pivot (yellow arrow) to remove the wood panel.
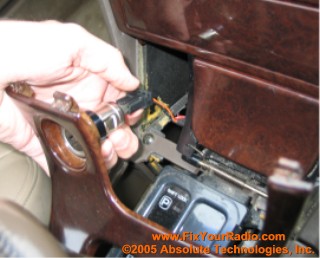
Figure 5 - Cigarette Lighter of the Wood
Panel
The cigarette lighter will have a wire connector on it. To remove it, you must push in the tab on the connector (it's where the thumb or pointing finger is in Figure 5) that keeps the connector locked in place. With the tab properly pushed in, the connector will slide off. Remove the wood trim panel and set it aside (back seat is a nice place...don't put it somewhere where you may sit on it or lean on it...learn from my mistakes)
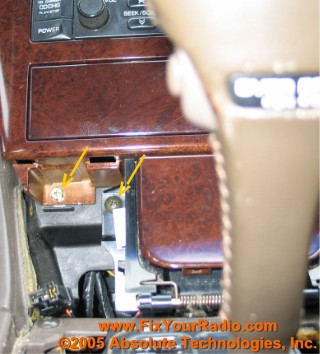
Figure 6 - Lower Screws
Position the gear shifter in Neutral by inserting the key and turning the keys to the Accessory position...push in on the brake and shift gear lever to get it out of your way (to allow better access to the next screws to be removed). Figure 6 shows the location of two screws to be removed (they are to the left of the ashtray). If you have a magnetic tipped philips screw driver, that is the best because unless you are very careful, you're likely to drop one of them in the shifter area (again, learn from my mistakes).
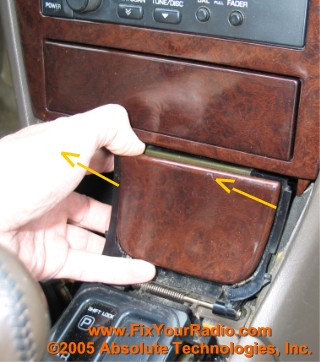
Figure 7 - Ashtray Removal
The ashtray will pop from the dash (once the screw next to it in Figure 6 is removed). The ashtray is held in place by the screw which you should have removed and by two compression clips on the righthand side. You should be able to pull the ashtray out (it may help to open the ashtray and pull on it).
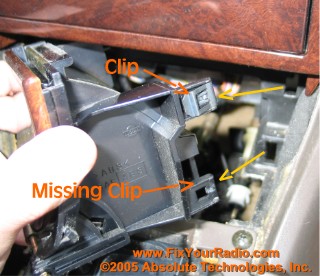
Figure 8 - Ashtray Compression Clips
Figure 8 shows the location of the two compression clips (yellow arrow) that holds the ashtray in place. Note on the ashtray in Figure 8, one of metallic clips is missing off the tab...they sometimes pop off behind the panel where the ashtray was...you may want to check and replace them on the ashtray, if needed.
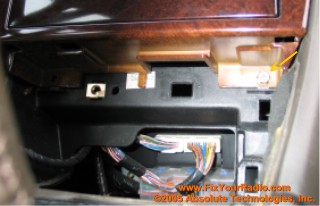
Figure 9 - Screw behind the Ashtray
With the ashtray removed, there is another screw that needs to be removed (pointed to by the yellow arrow in Figure 9 above). Again, a magnetic tipped philips head is ideal.
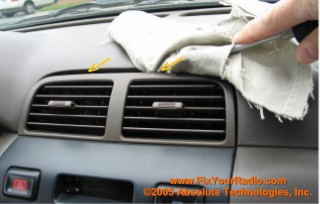
Figure 10 - Air Vent Assembly Removal
Removing the air vent assembly can be tricky...just be patient. You must use a cloth covered big screw driver as shown in Figure 10. Use the screw driver covered by cloth to insert into the crack where the vents met the dash. You will have to work the screw driver around to push down on the clip area holding the vent assembly in place. While pushing down on the screw driver, you will also be trying to pry the vent assembly out with the screw driver.
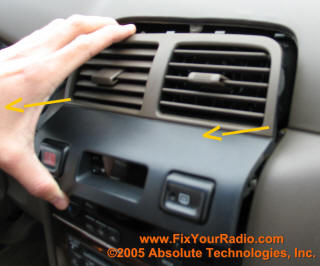
Figure 11 - Removing Air Vent Assembly
As shown in Figure 11, you want to pull the vent assembly straight out of the dash, maybe even with a slight downward pull (pulling upward is not suggested since there are some tabs that are pushed into loops on the bottom of the assembly...see Figure 12 below).
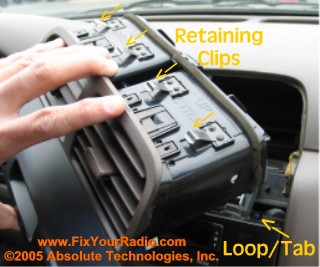
Figure 12 - Air Vent Assembly Clip
Figure 12 shows the clips that retain the vent assembly in the dash (knowing where these are located is sometimes helpful when you are trying to pry this out of the dash).
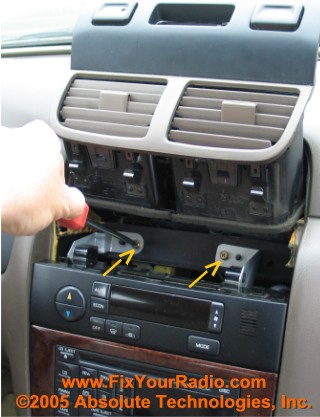
Figure 13 - Top Assembly Screws
Figure 12 shows the clips
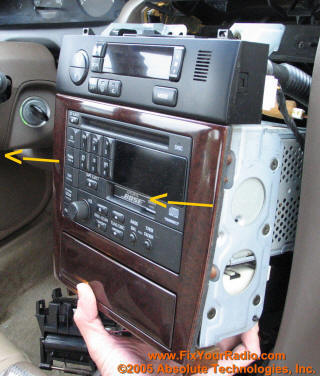
Figure 14 - Pull Radio Assembly Out
With the top two screws removed, you should be able to pull the radio assembly out a bit (not all the way yet).
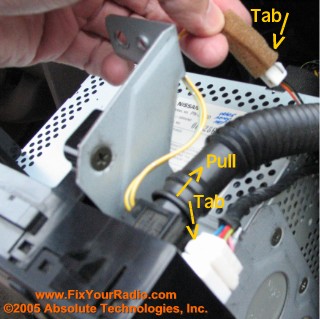
Figure 15 - Environmental Controls Connections (Three)
You'll find three connections that connect to the environmental control unit...two electrical connectors and one vent hose. The vent hose will simply pull off the assembly. The other two electrical connections can be undone by pushing on the locking tab of each connector and pulling apart.
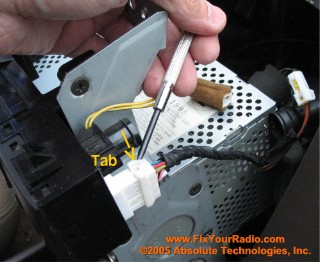
Figure 16 - Environmental Controls
Connection - Screwdriver helps with locking tab
There is a stubborn locking tab on the inside area of the connector as shown in Figure 16. It is helpful to use a small screw driver to release the locking tab to be able to pull the plug out of the connection.
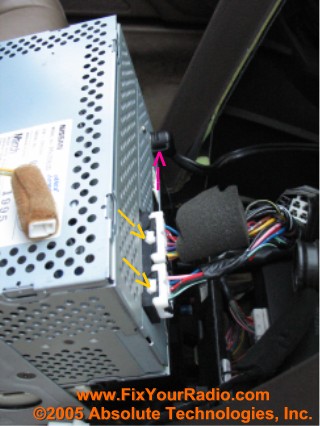
Figure 17 - Locking Tabs of the Three
Connectors on the Radio

Figure 18 - Screwdriver helps with locking tab
This same method of using the small screwdriver to push in on the white tab is useful to remove two of the connectors on the back of the radio. The radio will typically have two connectors with the tab that needs screwdriver, and then there is the antennae plug which just has a locking tab that is released easily by pushing in on the black tab and then removing the antennae connector.
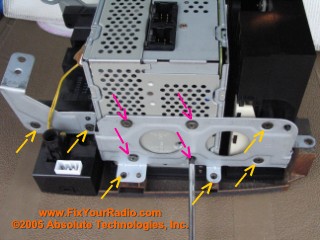
Figure 19 - Radio Assembly Out
Figure 19 shows the location of the screws that need to be removed (the yellow ones need only be loosened on one side, while they are removed on the other side). The ones pointed to by purple arrows are sometimes difficult to loosen (and need to be removed on both sides)...make sure you have the proper matching size phillips screw driver head for these screws (or you will risk stripping the heads) and you may want to position the assembly so that you can get maximum torque out of your screwdriver.
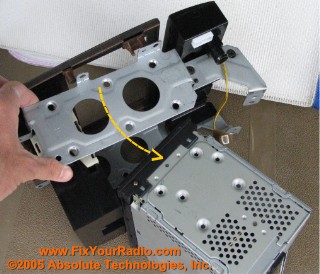
Figure 20 - Remove the Radio
With the screws removed, you should be able to slide the radio out of the assembly.
![]()
DID YOU FIND THESE INSTRUCTIONS USEFUL?
If you have found these instructions useful, then please consider a donation. It helps keep this web site up and running and supports more development of this type material.
Thanks for your kind consideration.
To make a $3 donation using PayPal, click the donate button below...
Again, thanks for your consideration.
![]()
Now with your radio out, if you are looking for the do-it-yourself instructions for repairs on this radio for CD issues, you may gain access by purchasing via PayPal here:
Click one of the above Icons to purchase the
CD Error Repair Access (Nissan '95/'96)
$19.99
(If you are looking for the ERRATIC OPERATION/BLANK DISPLAY FIX...SCROLL ON
DOWN...this is not the place to pay for that fix)
THIS RADIO SHOULD HAVE BOSE AND A "CN503" ON THE CASSETTE DOOR
NOTE:
Your login and password will be immediately sent to the email address
that is registered with your PayPal account. If this is not the
proper email address you want the login and password sent to, please send
a note with the proper email address, however, there will be a delay as
the email will have to be manually processed. If you want to avoid
any delay, make sure your PayPal email address is correct.
MAKE SURE YOUR EMAIL IS CURRENT AND CORRECT IN PAYPAL TO AVOID DELAY ON DELIVERY OF YOUR LOGIN AND PASSWORD.
If you realize that it was not current when you confirmed your PayPal contribution, please send me an email (dharrison@ab-tech-inc.com)
NOTE: Microsoft's Outlook Express is sometimes set not to allow viewing of attachments due to security issues (this may have been set automatically without your knowledge by Microsoft). If you are unable to read the attachment that is automatically sent to you once you donate via PayPal (or you do not see an email reply within 10 minutes), try this: In Outlook Express click Tools, Options, Security and uncheck the box by "Do not allow attachments to be saved or opened that could potentially be a virus". You may re-enable this once you have the chance to get your login and password from the email attachment that is sent.
TOOLS NEEDED FOR THE DO-IT-YOURSELF REPAIR INSTRUCTIONS
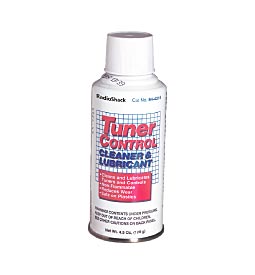

9
10
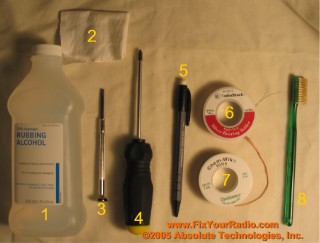
Figure 21 - Supplies Needed for Do-It-Yourself Repair
1. Rubbing Alcohol - for
cleaning the residue (flux) left by the solder.
2. Rag - For cleaning the residue (flux) left by the solder.
3. Small Screw Driver - used more for prying than for the screwdriving.
4. Phillips Screwdriver (magnetic tipped one is handy).
5. Eraser (like any found on a pencil).
6. Silver- Bearing Solder 0.015" dia. (Radioshack #64-035, $3.99)
7. Solder Wic (Desolder
Braid, Rasioshack #64-2090, $3.19))
8. Old Toothbrush - helps in scrubbing the residue off the board left by the
solder.
9. TV-Tuner / Control Cleaner / Lubricant (Radioshack #64-4135, $9.39)
10. 40 Watt Pencil Iron (Radioshack #64-2071, $8.39)
![]()
For the do-it-yourself instructions for repairs on this radio for Erratic Operation or no operations, or blank display, you may gain access by purchasing via PayPal here:
Click one of the above Icons to purchase the
Erratic Operation / Blank Display Repair Access (Nissan '95/'96)
$19.99
(If you are looking for the CD ERROR FIX...SCROLL UP...this is not the place to pay for that fix)
THIS RADIO SHOULD HAVE BOSE AND A "CN503" ON THE CASSETTE DOOR
NOTE:
Your login and password will be immediately sent to the email address
that is registered with your PayPal account. If this is not the
proper email address you want the login and password sent to, please send
a note with the proper email address, however, there will be a delay as
the email will have to be manually processed. If you want to avoid
any delay, make sure your PayPal email address is correct.
MAKE SURE YOUR EMAIL IS CURRENT AND CORRECT IN PAYPAL TO AVOID DELAY ON DELIVERY OF YOUR LOGIN AND PASSWORD.
If you realize that it was not current when you confirmed your PayPal contribution, please send me an email (dharrison@ab-tech-inc.com)
NOTE: Microsoft's Outlook Express is sometimes set not to allow viewing of attachments due to security issues (this may have been set automatically without your knowledge by Microsoft). If you are unable to read the attachment that is automatically sent to you once you donate via PayPal (or you do not see an email reply within 10 minutes), try this: In Outlook Express click Tools, Options, Security and uncheck the box by "Do not allow attachments to be saved or opened that could potentially be a virus". You may re-enable this once you have the chance to get your login and password from the email attachment that is sent.
Tools/Supplies that you should have available for this
repair of the erratic operation/ blank display...
1. Small Screw Driver - used more for prying than for the screwdriving.
2. Phillips Screwdriver (magnetic tipped one is handy).
3. Needle Nose Pliers
4. Silver- Bearing Solder 0.015" dia. (Radioshack #64-035, $3.99)
5. 40 Watt Pencil Iron (Radioshack #64-2071, $8.39)
Optional
6. Solder Wic (Desolder
Braid, Radioshack #64-2090, $3.19)
![]()
Please contact me if you have any questions (dharrison@ab-tech-inc.com)
If you are looking to send your radio in for the repairs, you may send your radio to:
Absolute Technologies, Inc.
Attn: Duane Harrison
PO Box 601
Holly Springs, NC 27540
Please include a detailed description of the problem that you are experiencing. These repairs are typically completed with 48 hours of receiving the unit (unless the unit comes in on the weekend). You may include your payment with your radio ($144.98 = $119.99 repair +$24.99 shipping/insurance) or you may use PayPal (if using PayPal you may wait until I am ready to ship your radio back....I will send an email when the radio is ready for return).
![]()
![]()
Home Page
Radio
Removal| Ford/Quest
"The Fix" CD
Eject Error Fix
Chrysler
/ Jeep Fix
Save
My Sanity Instructions
Mail Payment
PayPal
Payment
Success
Emails
Post
a Comment
Other Explorer
Issues
Disclaimer
Sponsors
![]()
ALL CONTENTS ON THIS SITE ARE PROTECTED BY COPYRIGHT. EXCEPT AS SPECIFICALLY PERMITTED HEREIN, NO PORTION OF THE INFORMATION ON THIS WEB SITE MAY BE REPRODUCED IN ANY FORM, OR BY ANY MEANS, WITHOUT PRIOR WRITTEN PERMISSION FROM D. HARRISON. VISITORS OR USERS ARE NOT PERMITTED TO MODIFY, DISTRIBUTE, PUBLISH, TRANSMIT OR CREATE DERIVATIVE WORKS OF ANY MATERIAL FOUND ON THIS WEB SITE FOR ANY PUBLIC OR COMMERCIAL PURPOSE.